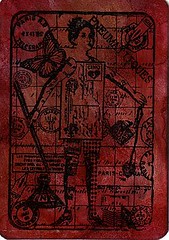
Just to let you know, artist Lisa Vollrath is offering a countdown of new holiday images every day until Christmas at her Go Make Something website. You must post a link to the countdown in your own blog or art group somewhere, but otherwise these images are free!
Amy

Saturday, December 15, 2007
Thursday, December 13, 2007
Long Time, No Post.
Hey there! It's been quite a while since I've posted on here, but with the holiday season and my daughter in school it seems I have less time than usual (you would think with her gone all day I would have more time, but it doesn't seem to work out that way!).
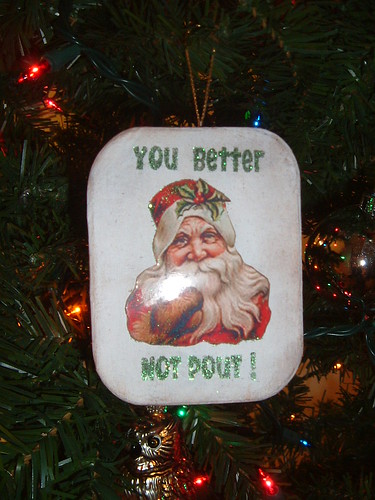
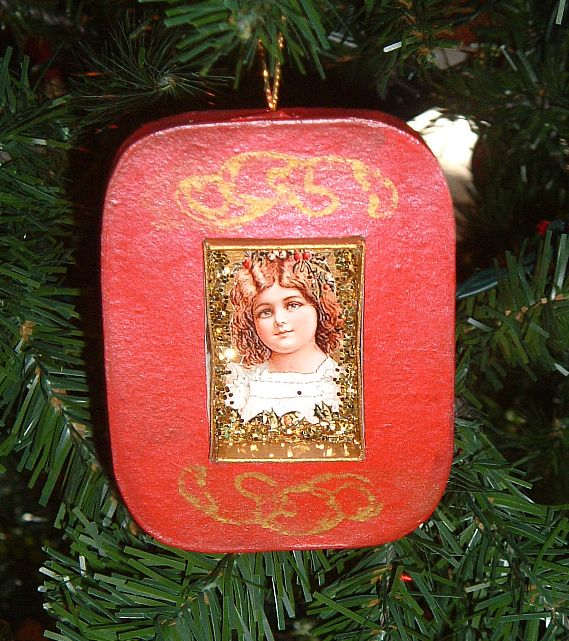
Anyway, I've been pretty busy making ornaments and trying to put together some gift baskets. These ornaments are paper mache and I got them at Michael's. the first one I painted and added the images. The glittery writing was a sort of rub-on kit that included glitter that you pat onto the letters (sorry about the glare on the photo):
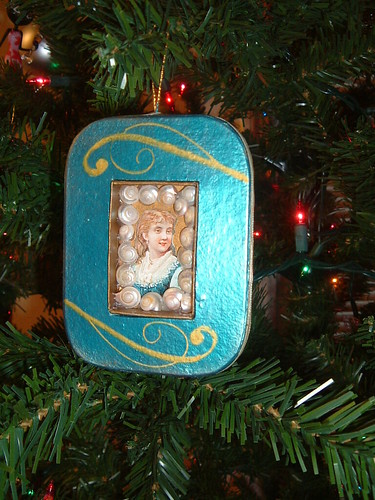
This one was also painted, and then I cut a niche out of it to slide a matchbox into. Then I glued the image on and hot glued the shells around it. There is also ribbon around the outside edge. (I got this idea from the latest issue of Somerset Studio).
*Edited to add the following photos:
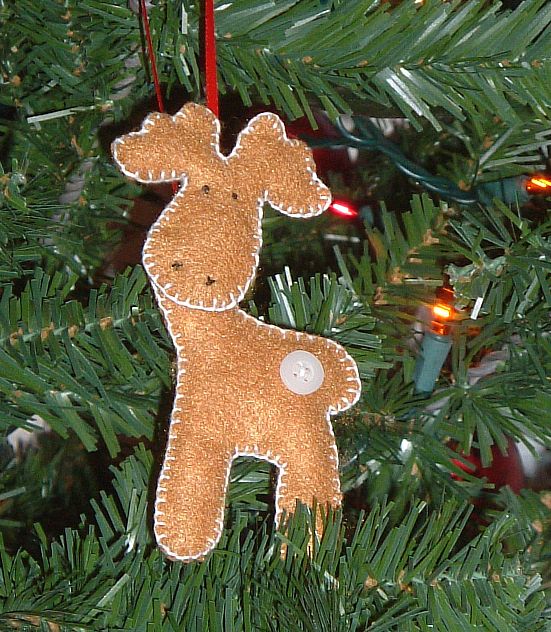
This one I embroidered from a pattern I got here. He took a while, but I think he's pretty cute.
Well, there they are- I hope you like them. I plan on posting more ornaments I've made soon- these are made of embroidered felt. In the meantime, I hope your holidays aren't too stressful!
Amy
Anyway, I've been pretty busy making ornaments and trying to put together some gift baskets. These ornaments are paper mache and I got them at Michael's. the first one I painted and added the images. The glittery writing was a sort of rub-on kit that included glitter that you pat onto the letters (sorry about the glare on the photo):
This one was also painted, and then I cut a niche out of it to slide a matchbox into. Then I glued the image on and hot glued the shells around it. There is also ribbon around the outside edge. (I got this idea from the latest issue of Somerset Studio).
*Edited to add the following photos:
This one I embroidered from a pattern I got here. He took a while, but I think he's pretty cute.
Well, there they are- I hope you like them. I plan on posting more ornaments I've made soon- these are made of embroidered felt. In the meantime, I hope your holidays aren't too stressful!
Amy
Wednesday, October 17, 2007
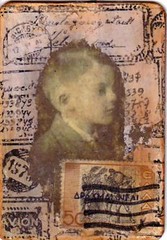
Gothic Arch

Gothic Arch
Originally uploaded by queenoffools1974.
I made this for a swap in a group I belong to on Yahoo. It was really fun to make too, so much that I want to make a lot more for a book like THIS.
To start, I painted the whole card a charcoal color then stamped the tombstone. I then masked the tombstone and painted gesso over the rest of the card to lighten the gray. I over stamped (with the mask in place) some background writing using a gold paint pen.
I then went over that with the same gray toned down with some glaze medium. I laid a paper towel over the top while it was wet then peeled it off to take some of the glaze off and give it some texture.
I added the boy, wings, and the clock rub-on (7Gypsies) and then highlited some areas with a pencil, rubbing it around to give it some shading. I then went over the whole card with some gel medium- again using the paper towel trick to give it texture.
That's it! I hope you enjoy.
Amy
Tuesday, October 16, 2007
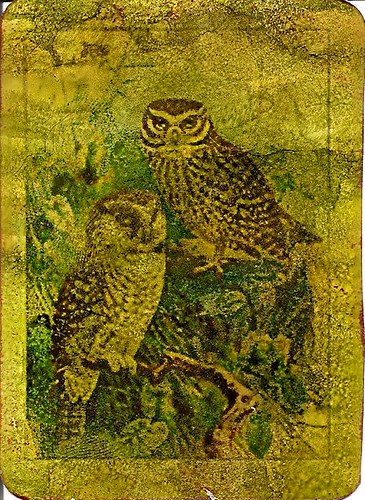
NightOwlPhoto
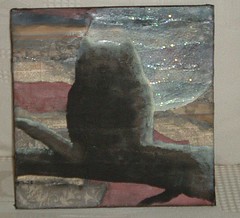
NightOwlPhoto
Originally uploaded by queenoffools1974.
Well, I finally finished the altered canvas collage I've been working on for a couple of weeks now. I feel like it's missing something, but I always feel like that so I probably won't add anything to it (except a sealant).
To make this, I tore some very cool 7Gypsies paper lengthwise and glued it all over the board until I was happy with it, then covered the white torn bits with black ink and some acrylic paint where I felt it needed it. I then painted the moon and used a paper towel to sponge off some of the paint. Then I put a glittery glaze over the moon for a bit of sparkle.
The owl and branch I painted last in black with shading the same color as the moon. I also edged the canvas with black paint. This is the first canvas that came out roughly the way I saw it in my head. I can't wait to make more of these.
Amy
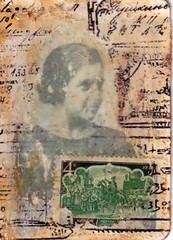
Wednesday, October 3, 2007
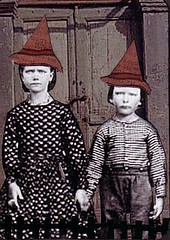
Vintage Halloween Challenge Entry
This card was my entry for this months ATC Challenge on Craftster.org. It was done with alcohol inks for the background, rubber stamping that I then wet to age it, and a rub-ons for the fence and border on the top. I'm kept feeling like it needed something else, but I couldn't figure out what. I just left it as is.
 This was my "alternate" choice. The kids are pretty creepy, but I didn't really like how busy they looked over the background.
Amy
Monday, October 1, 2007
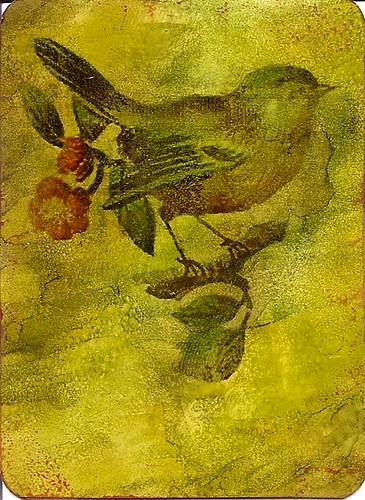
Three Birds

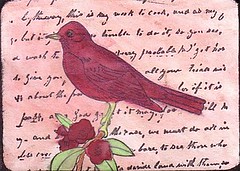

These cards were really fun to make. I first stamped the bird image (Martha Stewart Crafts at Michael's) and then painted them with different colors of Twinkling H2O paints. I then stamped the bird again on a scrap piece of cardstock and used it as a mask so I could stamp the words over the top. Fun, easy, and addictive- plan to make similar cards like this with some other stamps I have. I'll let you know how it goes.
Amy
Monday, September 10, 2007
More fun with Alcohol inks!
Here are two more ATC's I made using alcohol inks and rubber stamps. I love the colors you can get from even a limited palette of inks.
Well, I'm off now to start work on some creepy themed art for Halloween, my favorite holiday!
Happy crafting,
Amy
Monday, September 3, 2007
Finally, some new ATC's!
So, last week I went to The Artist's Oasis where I attend ATC club meetings and get cool supplies. I picked up some alcohol inks and blending solution (both Adirondack brand) and started experimenting. I didn't have any glossy cardstock so I used some 4x6 glossy photo paper. I used the Pesto and the Espresso that came in the kit to get the backgrounds for these. After that it was just a matter of printing the images on the photo paper, cutting them to size and distressing the edges (Ranger Distress Ink). I plan to do a bunch more of these because I love they way they came out. There's also a Raisin color that came in the kit. I'll let you know how it goes.
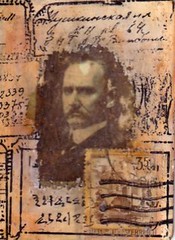
Thursday, August 23, 2007
Photo Fun
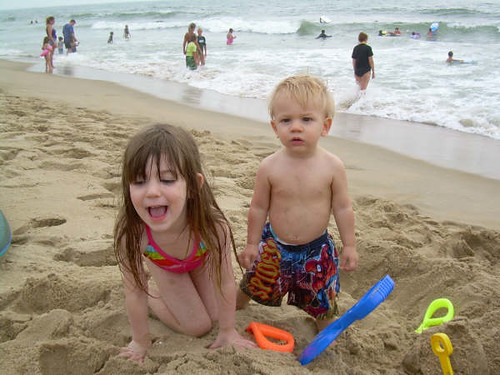
This is a photo of my children, Maddy (nearly 5) and Vincent (newly 1) at the shore in Ocean City, Maryland two weeks ago. They had a great time, despite the sometimes-overcast weather.
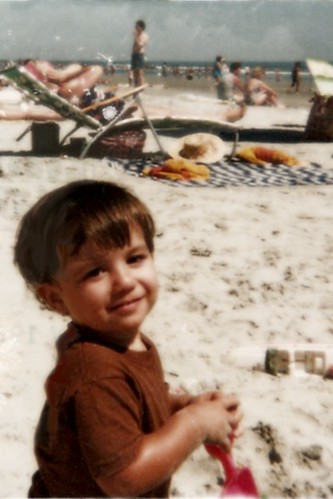
This is a photo of my husband Brian as a kid at the Jersey shore. This picture was pretty damaged, so I had to do some altering to get it to look okay. I used the free Gimp program.
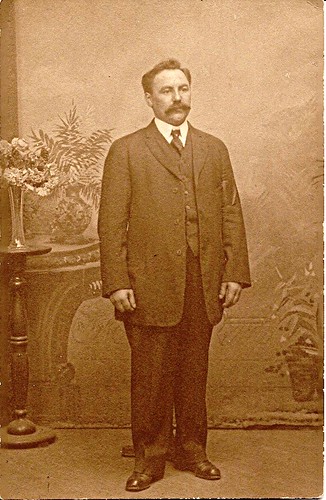
This is a postcard that my Mother-in-Law and I discovered while searching through boxes of pictures. This is my husband's Great-Grandfather, Peter.
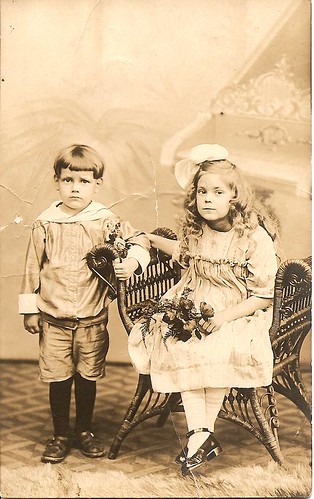
These are two unknown relatives.
Both of these images can be found in the Flikr Collage Images Group, a great resource for vintage images to use in artwork.
Wednesday, August 1, 2007
Lazy, Part 2....
Still not up to a whole lot lately aside from spending quality time with my kids. Reading, in my spare time, or watching seasons of television shows that I've missed. It's far too hot to spend much time outside, but we managed to got to the playground and get out a bit. I've been working on a couple of projects, journaling, and mostly puttering around art-wise, but I haven't done much I feel like posting yet. Soon, I hope.
I did make it to the ATC Club meeting at a place called the Artist's Oasis in Apex, NC. I had a lot of fun and met some very nice ladies. It's nice to meet with real live people to talk about the techniques and art in general. I also picked up some great stuff in the store- at a discount, even, because of the club. I can't wait to go again next month and swap some cards this time!
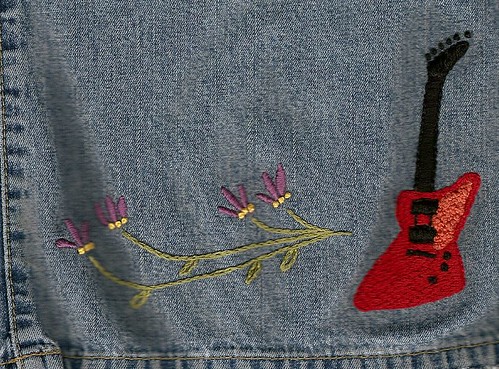
This is what I've been working on while watching old seasons of the (now cancelled) Veronica Mars. I have to be doing something with my hands while I sit and it seemed like sprucing up an old pair of jeans in the process was a good idea. The patterns come from Jenny Hart's Stitch-It Kit. Great patterns (can't wait to get more!) and even instructions if you don't know how to embroider already (or forgot how, like I did).
Well, that's all I have now. Let the laziness resume....
Amy
I did make it to the ATC Club meeting at a place called the Artist's Oasis in Apex, NC. I had a lot of fun and met some very nice ladies. It's nice to meet with real live people to talk about the techniques and art in general. I also picked up some great stuff in the store- at a discount, even, because of the club. I can't wait to go again next month and swap some cards this time!
This is what I've been working on while watching old seasons of the (now cancelled) Veronica Mars. I have to be doing something with my hands while I sit and it seemed like sprucing up an old pair of jeans in the process was a good idea. The patterns come from Jenny Hart's Stitch-It Kit. Great patterns (can't wait to get more!) and even instructions if you don't know how to embroider already (or forgot how, like I did).
Well, that's all I have now. Let the laziness resume....
Amy
Sunday, July 22, 2007
Lazy Summer
Hey there! It occured to me that I haven't written anything on here for a while so I thought I would check in. The main reason is that it's summer and, though my husband is overseas, there seems to be no end to the summer activities and distractions that keep me busy. I'm taking a bit of a break from swaps and creating in general just to recharge and indulge in more leisurely pursuits.
For example, this last week was "Harry Potter" week. I splurged on a babysitter and went to the movie and then, although it arrived at my doorstep only yesterday, finished the last book in the series in a 24-hour frenzy of laughter, tears, and little sleep. It was, by the way, totally worth it.
So, while I prepare to spend a week at the beach and send my daughter off to her first day of kindergarten next month, I'm turning over ideas in my head and contentedly browsing through art magazines from the comfort of my living room couch. I know I'll be back at it soon, and in the meantime, stay tuned later this week for a report on my first ever "live" trading session/meeting regarding ATC's at a Artist's store a few towns over. I'm very excited about it and, who knows, maybe it will be the jolt I need to get up off the couch and get cracking!
Amy
Thursday, July 5, 2007
Heart in a Jar
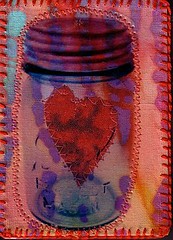
HeartJar
Originally uploaded by queenoffools1974.
This was a card I made a week or two ago (I'm posting now because it's been recieved). I glued fabric to a piece of watercolor paper, folded the sides and ends to the back and glueing as well. Then I stitched the red fabric heart to the card. I then stitched a cut out transparency of a jar over the top of that so you could see the heart sort of floating in the jar. I then embroidered a blanket stitch around the whole card.
I've been making a lot more fabric cards lately and playing with the transparencies is fun, too. I just recently picked up the book 1000 Artist Trading Cards by Patricia Bolton (Editor of Cloth,Paper, Scissors and Quilting Arts magazines) and there are a lot of examples of fabric ATCS that have inspired me to do more.
Lastly, to all of you who read and are fans of my tiny little blog (especially you Pattyjo)- Thank you! It means a lot to be able to share my work with you.
Amy
Tuesday, June 19, 2007
Card Making Walk-Through
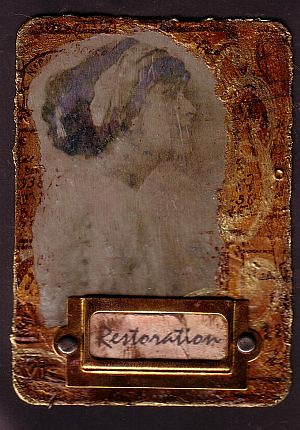
I put this walk-through of how I made this card on ATCards.com so I thought I would post it here as well.
I started with a card base of pretty cheap watercolor paper and put a layer of acrylics and glaze medium. At first was too dark (it looked like suede, though, which I liked) so I added some lighter shades and a layer of gel medium until I got this:
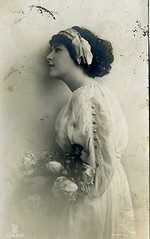
Then, I did the image transfer. This was actually my second attempt to transfer this image (the first image didn't transfer very well, which is fine because I decided I wanted it bigger anyway). Here is the image:
And here is the card after the transfer:
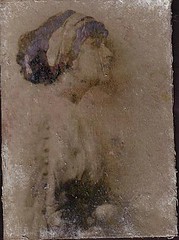
It's really not a very clear transfer, but for my purposes that was perfect. I like to make cards that look like I "uncovered" the photo so the fact that it looked a bit scratched and faded was fine.I put another layer of gel medium over the transfer to protect it for the next step. After that was dry, I put a layer of vaseline over the part of the image I still wanted to see, then I very lightly put a layer of school glue over the whole card and a layer of antique gold metallic paint over that for a crackle effect. This all has to be done rather carefully because you don't want the paint and the glue to mix. In the end, however, this particular card did not crackle very well, but it did sort of bubble and took on a roughed up look that I liked.

I decided that it was too gold so I used my finger to add some brown ink to sort of age the gold. I decided it need more, though, so I covered the image again with vaseline and stamped a background stamp over the whole thing with the brown and the wiped the vaselined area clean again (this trick is great if you want to go back and add something to the card but don't necessarily want it everywhere).

After all of that, I stamped a couple of swirls with gold ink and added the nameplate and distressed word (Restoration) to the card. I also decided that the brown edging of the card was too dark so I inked the edges with the gold. This is the final card (big photo so you can see it):
I started with a card base of pretty cheap watercolor paper and put a layer of acrylics and glaze medium. At first was too dark (it looked like suede, though, which I liked) so I added some lighter shades and a layer of gel medium until I got this:
Then, I did the image transfer. This was actually my second attempt to transfer this image (the first image didn't transfer very well, which is fine because I decided I wanted it bigger anyway). Here is the image:
And here is the card after the transfer:
It's really not a very clear transfer, but for my purposes that was perfect. I like to make cards that look like I "uncovered" the photo so the fact that it looked a bit scratched and faded was fine.I put another layer of gel medium over the transfer to protect it for the next step. After that was dry, I put a layer of vaseline over the part of the image I still wanted to see, then I very lightly put a layer of school glue over the whole card and a layer of antique gold metallic paint over that for a crackle effect. This all has to be done rather carefully because you don't want the paint and the glue to mix. In the end, however, this particular card did not crackle very well, but it did sort of bubble and took on a roughed up look that I liked.
I decided that it was too gold so I used my finger to add some brown ink to sort of age the gold. I decided it need more, though, so I covered the image again with vaseline and stamped a background stamp over the whole thing with the brown and the wiped the vaselined area clean again (this trick is great if you want to go back and add something to the card but don't necessarily want it everywhere).
After all of that, I stamped a couple of swirls with gold ink and added the nameplate and distressed word (Restoration) to the card. I also decided that the brown edging of the card was too dark so I inked the edges with the gold. This is the final card (big photo so you can see it):
Wednesday, May 9, 2007
PinkLadies
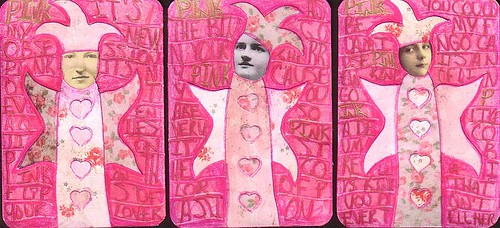
These were made for no special reason except that I was feeling sort of pink today. The words are from the Aerosmith song.
I put a pink watercolor wash onto cardstock, collaged the ladies using pink scrapbook papers (Daisy D's) and vintage images for the faces. Then I outlined them with Staedtler watercolor crayons in light magenta. I originally made the lines and words with a pink and red gel pen, but then I went over the words again with the crayon to blend everything.
These cards were heavily influenced by the style of Teesha Moore, a fabulous artist whose work I admire very much. Her art can be found at http://www.teeshamoore.com/.
Thursday, May 3, 2007
Hey, I joined the Carnival!
Craft Critique, a blog about all things crafty is having an Altered Items Carnival. Go here to check it out. Make sure you look at some of the other articles they have on there, too, as there are a ton of great suggestions for craft supplies as well as what to do with them.
Monday, April 30, 2007
Scrabble Charm
This week, in addition to working on my house and other ATCS for swaps, I've also been making altered Scrabble tile charms. After a few practice tries, it turned out to be a pretty simple undertaking.

I sanded the front, back, and sides of the tile and then painted the whole thing a pretty metallic green color. For the front, I collaged the boy and his hat on a piece of scrapbook paper cut slightly smaller than the tile itself and glued the whole thing to the side with the letter on it.
I outlined the boy and the paper with a gold metallic gel pen and added small punched out stars on the back so it wasn't plain. After drilling a small hole, I coated all sides with a good couple coats of varnish, letting it dry between coats (the longest part of the whole process).
After it was totally dry, I made a bead dangle and attached it with a jump ring. I also included a lobster claw clasp so it can easily be attached or removed without opening the jump ring. I wrote my name with a ultra fine pen on the bottom edge of the tile where it wouldn't really be seen.
That's it! My initial mistakes included covering both sides of the paper (which was then ruined every time I drilled a hole) and attempting to work with the tile when the varnish wasn't totally dry. Other than that, they were fun to make and I can't wait to see what goodies I get when these get swapped out.
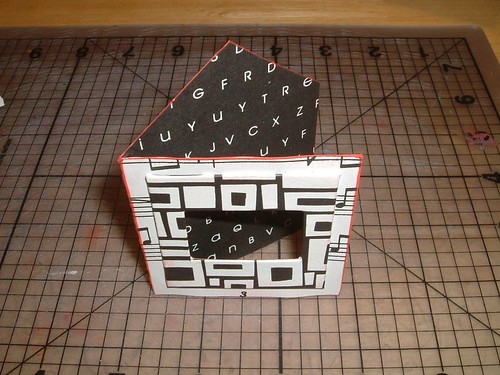
Finished House
Well, as promised, here are photos of one of my finished house cards- inside and out. I just added some German Scrap border, the woman's picture, words and a tiny gem. I wasn't quite happy with it, though, until I added a bit more in the window area.

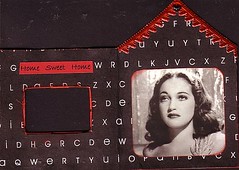
I know, I know-the scans are crooked. My scanner is pretty cheap and so cannot scan straight no matter what I do.
I know, I know-the scans are crooked. My scanner is pretty cheap and so cannot scan straight no matter what I do.
Monday, April 23, 2007
Simple House ATC
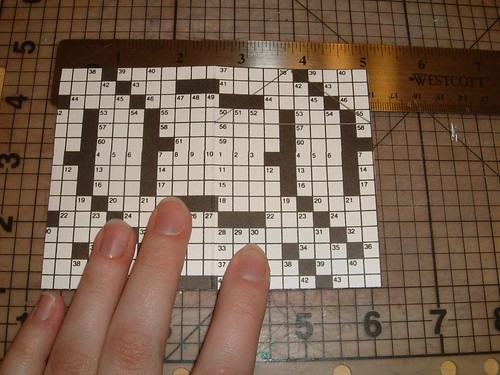
So, I joined a swap on ATCards.com with the theme of houses. I've seen some gorgeous cards on there (some of which are listed in my Wists) and while I want to be able to make cards like that, I decided to do something different. I wanted a card that looked like a house, but opened to reveal what was inside. I started with a 3 and a half by 5 inch piece of card stock weight scrapbook paper (like this crossword puzzle print).
I folded it in half lengthwise and marked a triangle at the top to cut out for the roof. I also cut the front triangle off so the front is a square and the back is the house shape.
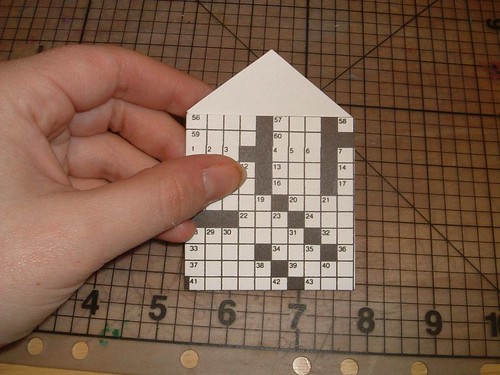
I then unfolded the card and glued a coordinating paper to the other side, being careful to use a bone folder to re-fold the card so it closes.

That's it for the basic card. I went further with these and covered half of a paper slide mount with another coordinating paper for the window and edged the whole card with red stamp ink for contrast.
Now all that's left is to add the images I want in the window and any other embellishements and they will be ready to go.
I folded it in half lengthwise and marked a triangle at the top to cut out for the roof. I also cut the front triangle off so the front is a square and the back is the house shape.
I then unfolded the card and glued a coordinating paper to the other side, being careful to use a bone folder to re-fold the card so it closes.
That's it for the basic card. I went further with these and covered half of a paper slide mount with another coordinating paper for the window and edged the whole card with red stamp ink for contrast.
Now all that's left is to add the images I want in the window and any other embellishements and they will be ready to go.
Saturday, April 21, 2007
Charm
Charm
Originally uploaded by queenoffools1974.
I had orginally decided not to post this because I considered it a failure. Then I realized that maybe my failures could be as helpful as any other sort of tutorial I could post.
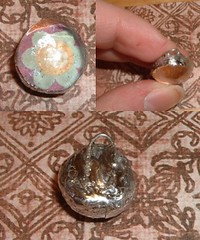
I had a bunch of flat-backed glass marbles laying around and wanted to try to make something new out of them. I've made magnets and even hair pins with them, but I saw this technique to make jewelry charms out of them in Josie Cirincione's book Collage Lost and Found.
It involved gluing an image to the back of the marble (which I had already been doing for the magnets) and then soldering the back with a small hook. As you can see from the photo, I put the foil tape and the hook on just like the pictures in the book.
My trouble involved the soldering. I had to use two different soldering irons because the first one kept blowing fuses in my house. The second one I used was made for automotive work, so the results were less than pretty. I tried my best to smooth it out, but the whole thing has a generally lumpy appearance.
It's passable as a charm and I guess it would be considered "rustic". I haven't given up yet, though. My next attempt at soldering involves only straight lines. Maybe that will help.
Thursday, April 19, 2007
TwoOwls
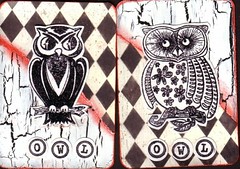
TwoOwls
Originally uploaded by queenoffools1974.
I made these two cards as I was just going through my stuff and finding things that matched. I posted them on ATCards.com and they were spoken for within a couple of hours. There are so many beautiful hand drawn and painted cards on that site it makes me feel honored that my little collages are wanted.
I've also figured out that I can trade my ATCS or my extra stuff for things that I want. I put a list of haves (like endless paper) and wants (like microscope slides) on there and, Voila! People are offering me things I want in exchange for things they want. Barter at it's best. I wonder if there are more forums where I can trade my stuff....
Wednesday, April 11, 2007
Rainy Day
It's raining today, and it's very dark outside. Weather like this always makes me want to nap, paint/draw, read, or go to the bookstore. I'm sure everyone feels they want to do certain things depending on the weather- if it's nice, for instance, they want to go to the beach or a park. Rain sort of makes you slow down (much like winter does) and simply find something quiet and comtemplative to do. These are days that my whole family can spend hours in different rooms with their own pursuits (even the nine-month-old) and be content. We're all here together, but there's no push to be connected and engaged at all times.
I like the rain, and the thinking and dreaming that comes with it.
I like the rain, and the thinking and dreaming that comes with it.
Thursday, April 5, 2007

Monday, April 2, 2007
Mail Day
I got so much stuff in the mail today, it was great. I received my Zetti cards from a swap on Craftster as well as a card from a personal swap. I also got a package of things I ordered from Teesha Moore's website, including some stamps and an issue of Play, her journal Zine. I'm so inspired now, but I'm having a hard time organizing my "crafty stuff" to my liking (and Brian's- he hates when it's all over the place).
What I need is a dedicated space to work, but with two adults, two kids, and two cats there is no room for it. I hate dragging it out of the cupboard every time I want to work on something and trying to cram it all back in there so we can eat dinner. Besides, putting it away keeps me from expressing sudden bursts of creativity.
I'm still working on it.
Thursday, March 29, 2007
New Layers
Also, I've dug out my jewelry findings to start incorporating some metal and other flashy bits into my cards. What I would really like to start doing is making little collage pendants and charms, but I'm not quite there yet with the supplies. Here is a recent example with the additions.
The Magic Man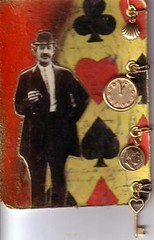
Saturday, March 24, 2007
Spring
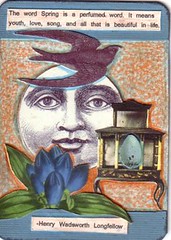
Spring
Originally uploaded by queenoffools1974.
I finished this card yesterday and it's already been mailed off to trade. I love the moon image- the face is so serene.
I am now worried, however, that the glued bits might come off. I sent another card for a swap and the small parts just seemed to slide right off. Now I must find a better glue and keep using my sticker maker for the smaller bits.
Friday, March 23, 2007
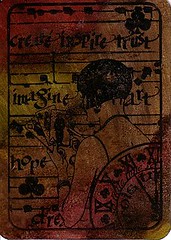
Recent ATC Collage Work

This is an example of my recent collage work. I'm trying to get better at composing collages that are compositionally good and that have something to say (since I am better with words than with art). Perhaps as I get better I won't need the words and the images can communicate as they are, but for now this is my "style".
Hello and Welcome!
Here I am starting a more formal blog (instead of the one on MySpace) for easier access. Hopefully I will keep up with this better than previous blogs, but I often suffer from doubt that anyone is interested in what I have to say.
If you are reading this and don't know me, allow me to introduce myself. My name is Amy and I currently live in Sanford, North Carolina. I was, however, born and raised in Indiana and will always be, in part, a Hoosier. I am married to a wonderful man, Brian, who hails from the great state of New Jersey. He is a Flight Engineer with the United States Air Force and we met and our daughter was born when we were both stationed in Germany. I got out of the military three years ago to stay home with our daughter and finish my degree. This semester I will earn my BS in Social Science from the University of Maryland. Our daughter, Madeleine, is four now and our son, Vincent, is 9 months.
Well, that's the nutshell. It in no way encompasses all or even much of what I am or what I do, but it will do for now. Stay tuned for more as time goes on.
Oh, yeah....
Some of you might be interested in where I got all of this "Queen of Fools" business. It's based on a poem I wrote many years ago. If I get froggy one day maybe I'll post it on here, but for now that answer will have to be sufficient.
Amy
Queen of Fools
Subscribe to:
Posts (Atom)